
Best way to set up your Aquarium in Just 4 Hours..Continue.. Part 3 final
So now you have your Marine salt water ready.
First thing is first; If you have an existing all Marine fish only Aquarium already set up and running with great water quality you can even skip this next step. That's if you are making your existing Aquarium in to a Reef Aquarium?
Anyhow it will still help to place mesh socks that are used for filtration (you'll need about 3 to 5 mesh socks) and fill them up 50/50 of one portion being live sand and the other half new sand. I really recommend you buy fine sand, it's worked the best on helping to seed it with already existing Live Sand.
Let these full Sand mesh socks sit in you already established Aquarium for about a month. You're asking why so long? Well I'm just trying to go about it the cheapest most affordable way to get a new Marine Aquarium set up. Of coarse you can always spend the $3 to $5 a pound for live sand from your Local Tropical Fish store and save you some time but not your money.
FAST FORWARD>>
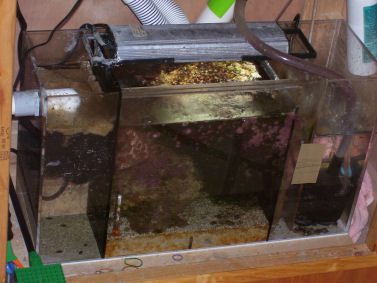
So now you have your mesh socks ready to go filled which have seeded your new sand. Take them out and pour all the sand into your new Aquarium in all corners of your new aquarium. Next pour the new left over sand which you had bought for the seeding process all around the bottom. Remember your doing this before you actually have poured the Marine (salt) water.
Checking the salinity and temp of the mix of Marine water you have made. If you have left it in a usable condition (correct temp and salinity). Go ahead and place a simi deep bowl in the center (so you won't disturb the sand bed too much of coarse). Now pour the Salt water in to the bowl and fill the tank about half way. Remember you're salt water will be at a temp of 72' to no more than 78'F. With a salinity between 1.019-1.023 the lowest being the best.
Now when everything has settled down, meaning the Sand the salt water has kicked up has subsided. You can do one of two things. Hopefully you have had a moderate amount of base rock from your other Aquarium. If not you can sometime look in your local paper for someone who is selling a lot of Base rock that was in their Tank and or even Live rock (But!! Remember you must Cure Live Rock either way, unless it's from your old Marine Aquarium)
Once you've decided on how or what means you're going to acquire your Live or Base Rock, you're going to need about 20% base rock and the Rest 80% Live Rock on the ratio of Pound per gallon. So if you have a 100 gallon Marine Aquarium you'll put in 20 lbs of base rock and 80 lbs of Live Rock (this is a rough estimated weight. It doesn't have to be perfect just close). Now It's better to put in all Live Rock but this Ratio you'll be fine. I've tried different ratios and this was what worked for me. You can start with less Rock in total, I know it's expensive. But you'll have to cut down on anything you might want to put in the Marine Aquarium at this time then.
Now you have the Base Rock and or all Love Rock in Great!! Now top of the water from you old aquarium and start moving things from your old to you new marine Aquarium, that's if you're not going to leave the other one up. If you do just take out enough to do a water change, but instead of bumping the salt water out put it in your new Aquarium.
If you're not going to leave the old set up do start to take The remaining sand bed out, if you used fine sand save about three mesh socks full (the one's that we're used earlier to seed the tank). Only do this if you're planning to set up a natural filtration system call Refugium of Plenum. <<<---- Links to more info. on these if you want to know what they are.
You're almost done!!
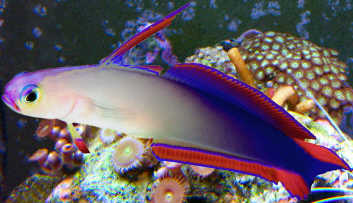
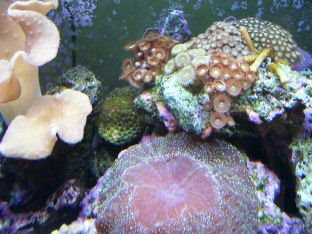
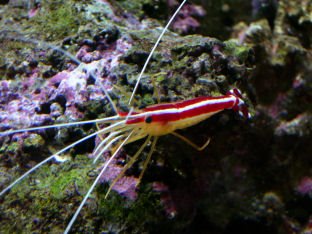
So you've added you're Live Rock now and the temp is great together with the salinity. Now you will have to monitor your water quality for a about four hours. Why well sometime you get temp and Salinity changes when everything is in place, so just in case have a little extra fresh water (RO water) and some Marine water handy. Once all parimeters are set you're good to go. Start adding live fish (not over doing it though!!) and some hardy corals that can handle new Marine Aquaria. I would say don't add more than 5 specimens to begin with. Make sure your Themometer is set properly and your Protien skimmer is working and adjusted, When adjusted properly this thing will help your tank sail smoothly.
Yes I know it seems like alot of work. And reading this and getting things done you'll probably take a bit longer. Remember this is for a Moderate to Experienced Marine Hobbiest. But it doesn't hurt if you are a beginner with some one else with experience to help you out.
So Please if you have tried this type of set up let me know how it went and what you learned.
Thank and I'llbe posting again soon.
Good luck,
TONEFISH
First thing is first; If you have an existing all Marine fish only Aquarium already set up and running with great water quality you can even skip this next step. That's if you are making your existing Aquarium in to a Reef Aquarium?
Anyhow it will still help to place mesh socks that are used for filtration (you'll need about 3 to 5 mesh socks) and fill them up 50/50 of one portion being live sand and the other half new sand. I really recommend you buy fine sand, it's worked the best on helping to seed it with already existing Live Sand.
Let these full Sand mesh socks sit in you already established Aquarium for about a month. You're asking why so long? Well I'm just trying to go about it the cheapest most affordable way to get a new Marine Aquarium set up. Of coarse you can always spend the $3 to $5 a pound for live sand from your Local Tropical Fish store and save you some time but not your money.
FAST FORWARD>>
So now you have your mesh socks ready to go filled which have seeded your new sand. Take them out and pour all the sand into your new Aquarium in all corners of your new aquarium. Next pour the new left over sand which you had bought for the seeding process all around the bottom. Remember your doing this before you actually have poured the Marine (salt) water.
Checking the salinity and temp of the mix of Marine water you have made. If you have left it in a usable condition (correct temp and salinity). Go ahead and place a simi deep bowl in the center (so you won't disturb the sand bed too much of coarse). Now pour the Salt water in to the bowl and fill the tank about half way. Remember you're salt water will be at a temp of 72' to no more than 78'F. With a salinity between 1.019-1.023 the lowest being the best.
Now when everything has settled down, meaning the Sand the salt water has kicked up has subsided. You can do one of two things. Hopefully you have had a moderate amount of base rock from your other Aquarium. If not you can sometime look in your local paper for someone who is selling a lot of Base rock that was in their Tank and or even Live rock (But!! Remember you must Cure Live Rock either way, unless it's from your old Marine Aquarium)
Once you've decided on how or what means you're going to acquire your Live or Base Rock, you're going to need about 20% base rock and the Rest 80% Live Rock on the ratio of Pound per gallon. So if you have a 100 gallon Marine Aquarium you'll put in 20 lbs of base rock and 80 lbs of Live Rock (this is a rough estimated weight. It doesn't have to be perfect just close). Now It's better to put in all Live Rock but this Ratio you'll be fine. I've tried different ratios and this was what worked for me. You can start with less Rock in total, I know it's expensive. But you'll have to cut down on anything you might want to put in the Marine Aquarium at this time then.
Now you have the Base Rock and or all Love Rock in Great!! Now top of the water from you old aquarium and start moving things from your old to you new marine Aquarium, that's if you're not going to leave the other one up. If you do just take out enough to do a water change, but instead of bumping the salt water out put it in your new Aquarium.
If you're not going to leave the old set up do start to take The remaining sand bed out, if you used fine sand save about three mesh socks full (the one's that we're used earlier to seed the tank). Only do this if you're planning to set up a natural filtration system call Refugium of Plenum. <<<---- Links to more info. on these if you want to know what they are.
You're almost done!!
So you've added you're Live Rock now and the temp is great together with the salinity. Now you will have to monitor your water quality for a about four hours. Why well sometime you get temp and Salinity changes when everything is in place, so just in case have a little extra fresh water (RO water) and some Marine water handy. Once all parimeters are set you're good to go. Start adding live fish (not over doing it though!!) and some hardy corals that can handle new Marine Aquaria. I would say don't add more than 5 specimens to begin with. Make sure your Themometer is set properly and your Protien skimmer is working and adjusted, When adjusted properly this thing will help your tank sail smoothly.
Yes I know it seems like alot of work. And reading this and getting things done you'll probably take a bit longer. Remember this is for a Moderate to Experienced Marine Hobbiest. But it doesn't hurt if you are a beginner with some one else with experience to help you out.
So Please if you have tried this type of set up let me know how it went and what you learned.
Thank and I'llbe posting again soon.
Good luck,
TONEFISH
posted by Marco at 3:40 AM
0 comments
![]()

